Like most people, I love most surprises. Birthdays, holidays and just a nice little surprise every now and then kicks the day off to a great start. However, there are surprises that no one really enjoys—like when your vehicle breaks down without much of a warning. Nonetheless, with careful attention, some early-warning markers can be easily identified, thus minimizing the occurrence of unforeseen vehicle mishaps.
One of the best ways to ensure those nasty surprises won’t happen is to conduct a pre-trip inspection of your personal vehicle. Although many people consider this something only commercial drivers do, it’s also something every driver should do. It doesn’t take as long as a commercial pre-trip inspection, but it can serve a similar purpose.
Begin at the Rear of the Vehicle
A pre-trip inspection for most passenger vehicles should take roughly a minute or two. Be prepared for a few additional minutes if you spot something wrong. Begin at the rear of the vehicle and examine the body and related equipment for things that appear abnormal. This could include damage from a collision. If there’s body damage and you’re sharing the vehicle with someone else, you’ll have time to address this with the other driver before departing.
While inspecting the rear of the vehicle, check the taillights, turn signals and backup lights to ensure they are not covered in dirt, mud or snow. The elements can obstruct critical signalling functions and lead to an accident. Also, ensure there are no cracks in any light covers. Every couple of weeks, check to ensure all the lights are working. This would include the brake lights, turn signals, taillights and even backup lights. If you’re alone, you can check to see if the backup lights are working by reversing toward a glass window and looking for the refection.
To complete your pre-trip inspection of the vehicle’s rear, you should ensure your licence plate validation sticker is there and hasn’t been ripped away by someone. Make sure your trunk lid is properly closed, especially if you were not the last person to drive the vehicle. And lastly, ensure the rear window is completely clear of the elements. You need to be able to see what’s behind you while driving. And don’t rely on the rear window defroster to clear it. You’ll be driving quite a long distance before it clears off enough of the dew, frost or snow.
Inspecting the Vehicle’s Side
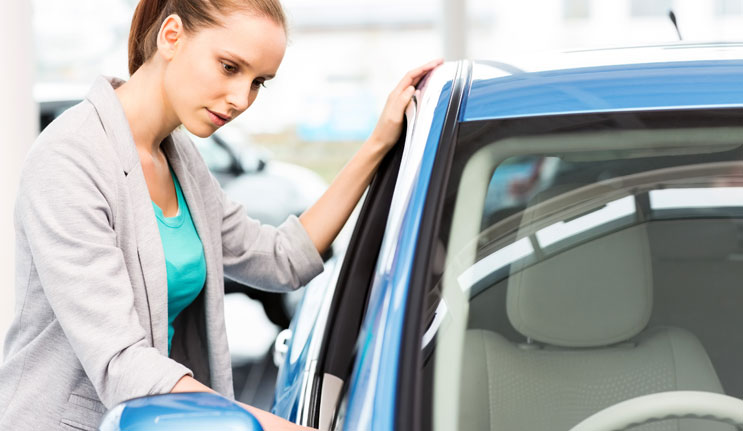
Once you’ve finished inspecting the rear of the vehicle, move toward the passenger’s side of the vehicle. Start with the side windows. They too must be clear of the elements before entering the vehicle. It’s tough to clean them once you’re in the driver’s seat and rolling the windows down doesn’t always work as well as you might think. Having a squeegee handy will help you do the job in mere seconds.
Moving away from the side windows, ensure all the doors are been properly closed. If you were not the last person to drive that vehicle, passenger doors may not be securely closed, meaning as you make a turn, the door may fly open causing panic to you and others nearby. Also, check for any body damage, just as you did at the rear of the vehicle, before you enter the vehicle and drive away.
Once the doors and windows have been inspected, ensure the side mirror is clean and not folded in. Many drivers fold in their side mirrors to avoid having them damaged while parked on the street or in a parking lot. Sometimes they get folded in by people passing by. From there it’s time for an inspection of the tires.
Keep Your Fleet Drivers Safe on the Road with These eLearning Courses on Pre-Trip Inspections:
Checking Tire Pressure
Checking your vehicle’s tires each time before you enter the vehicle can help to determine if they are losing air. However, with more tires increasingly being designed for performance, it’s getting more difficult to visually spot a tire that is low on air. Using a tire pressure indicator is the best approach for checking the air pressure in your vehicle’s tires.
Checking the tires while they are cold—less than 2 hours of immediate driving—is the best time to obtain a reading. Since many vehicles have Tire Pressure Monitor systems, they can usually help but will have to be used while driving. In addition to checking the tires for adequate air pressure, look around each tire for any objects which may cause damage to the tire. This would include nails, small pieces of metal or even glass. Placed correctly, it doesn’t take much to puncture a tire. Noticing the direction of the front wheels is the last thing to do. No one wants to be surprised the direction the vehicle moves once they release the brake pedal. Noticing the wheel direction can eliminate that surprise. Now it’s time to move to the front of the vehicle.
Inspecting the Vehicle’s Front
Many drivers ignore the windshield as they believe the wipers can clear it, but that’s not always the case. Inspecting the wipers for damage or debris under them is a good start to improving the driver’s visibility. Small twigs or leaves can get wedged under the wiper which not only cause streaks across the window, but they can also damage the wiper or blade. Every two weeks or so, use a mild cleaner to clean off any grit or grime from your wiper blade. This can help to prolong the life of windshield wipers, plus improve the driver’s visibility. This is also a good time to inspect the windshield, looking for pit marks or small chips. These chips may be out of the driver’s view so they may not have been noticed while driving.
From there, ensure the hood is completely latched. If someone else checked the oil or added washer fluid, they may not have closed the hood completely. Ensure the headlight lenses are clear as well as the licence plate, if your jurisdiction mandates a front plate. If the headlight lenses have turned yellow, you can use a lens cleaner to get them a little clearer. You’re almost done, but not quite. Take a quick glance underneath the front of the vehicle and look for any fluid leaks. If you notice a liquid there, touch it to see if it’s gritty. If it isn’t, it’s most likely water from the air conditioning.
Once you’ve inspected the front of the vehicle, check the same items on the driver’s side. Whichever side of your vehicle has the gas cap, ensure that the cap is secure by turning until you hear one click of the cap. This pre-trip inspection seems like it would take a long time, but it doesn’t. I like to look at it this way. It would take me longer to get service at the side of the road than it would to identify the problem before entering the vehicle.
About the Author

Scott Marshall has spent over 30 years promoting road safety. He has been a road safety journalist since 2005. Scott was also an on-air judge on the Discovery Network’s Canada’s Worst Driver during its first three seasons. Scott welcomes any questions or comments you may have at safedriver36@yahoo.ca.
Keep your employees safe at work with these training courses on fleet safety:
Speeding Awareness – Large Vehicles